Christmas Delights

…while many of you are busy preparing for Christmas dinner I’m having a little down time

Our big Christmas celebration took place last night on Christmas Eve. My husband has long enjoyed the German tradition of opening gifts on the 24th since we first met 42 years ago. Now that our children are grown and have significant others we only prepare Christmas dinner every other year and this is that year. Later today we will be driving to Hamilton to enjoy a dinner prepared my daughter and her husband.

I thought I would take this time to share some of the highlights of this years Christmas season. As many of you know I’m a teacher librarian/art teacher. I essentially teach every student in the school for library and I have four classes that I do art with.

The week before Christmas I started receiving gifts from students and their families. There’s always one gift that stands out for me and this one brought a huge smile to my face and I couldn’t wait to share it with my colleagues and friends.

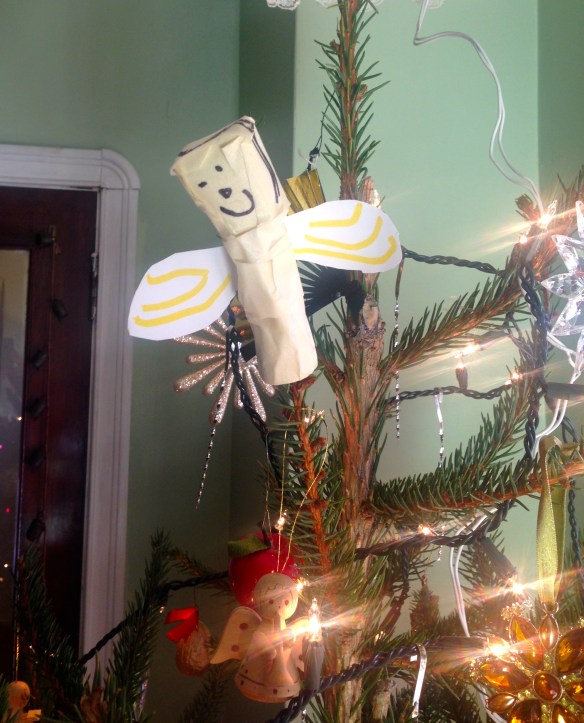
One of my grade one students brought me a small box that he had clearly wrapped himself and very proudly handed it to me. When I unwrapped the paper I discovered that the box was from Juicy Couture. IMG_7136 When I read the name out loud, T very quickly declared that the box had nothing to do with what was inside. When I opened the lid I couldn’t help but smile for inside the box lay an angel that he had clearly made himself.IMG_7137

He used masking tape, paper and marker to create this little gem. Today it sits prominently  on my Christmas tree, just below our angel tree topper. Aren’t kids wonderful?

IMG_7140

Hopefully I’ll have more stories to share throughout the week.

Merry Christmas to all and happy holidays.

Carol

Imaginary Creatures Created From Sidewalk Cracks

….I can’t tell you how much my students loved going outside and sketching the cracks in the pavement

Today my grade two students took their favourite sidewalk crack and using it as the starting point drew an imaginary creature. I can’t take credit for this idea. I’m taking an on-line class with Carla Sonheim called Imaginary Creatures and one of the assignments was to pull out images from cracks anywhere you could them.

Here are some of the creatures that my grade two class created today. I included two of the original cracks that inspired the finished project. I hope you enjoy them!


Blindly Drawing Lines to Create an Abstract Masterpiece

….with their eyes closed my students started to draw lines randomly across their paper

I didn’t want students to have a preconceived idea of what they wanted to draw so I asked them to close their eyes, and start drawing one continuous line all over their paper. When they opened their eyes they were allowed to add some more line if there was a lot of untouched space or if some of the shapes that they created were very large.

They rotated their paper to see which way they wanted to orientate their design and then they chose a variety of pencil crayon colours. I encouraged them to start with one colour and fill in spaces in different  areas of the paper. Then they moved on to the next colour and then the next. When they had used all their colours they re-examined their work and decided where more colour was needed and determined if it was balanced.

After all the colour had been added I suggested to some that they go over some of the same areas again so that the shapes were fully covered. Once that was done they were allowed to take a black fine point Sharpie and start adding some line detail to their shapes. Some students found animal shapes and added eyes, noses and scales, while others made random lines and dashes.

I think they did an amazing job. These samples were done by my grade 1 and grade 2 classes.

Starry Nights in Oil Pastel and Watercolour

….children in grades one, two and three create their own version of Van Gogh’s Starry, Starry Night

Once again I was inspired by Carla Sonheim’s Free Kids Online Art Classes. In week two Diane Culhane introduced the kids to a crayon resist night sky.

The children loved how the watercolour brought up the crayon designs, especially the white marks. They also loved sprinkling salt over their creations. The concept of cutting out a black silhouette of a city or country skyline was a bit more challenging, especially for the grade ones. Here’s a collection of paintings created by my grade two class.

Warm and Cool Picasso Dogs

….this will be the last group of Picasso Dogs that I post

Carla Sonheim has inspired me to teach my students about Picasso. Each grade level was  approached slightly differently to meet the curriculum expectations for that grade. This gallery of Picasso Dogs was done by my grade three class and the emphasis was on cool and warm colours.

Grade 2s Love Their Picasso Dogs

….same process as the grade 1s but we learned how to mix primary colours to make secondary colours

Thanks to Carla Sonheim’s free kids on-line classes for this terrific lesson.

Click on each image to get the entire picture.

Picasso Dogs From the Imaginations of Grade One Students

….thanks to Carla Sonheim’s free on-line kid’s art lessons for this idea

For my very first art lesson this year I introduced my grade one, two and three classes to Pablo Picasso. We looked at his traditional vs abstract paintings and explored some of his unusual portraits. Carla’s unique approach to drawing an abstract dog made the assignment fun and less intimidating than drawing a traditional human face.

After we practised drawing some dog features (snouts, eyes, ears, tails, paws) I gave each child a piece of watercolour paper and instructed them to draw an eye, turn the paper and draw a larger eye and continued like this until there were six or seven features on the paper. Then they had to turn the paper and find the layout they liked best and start joining the features to create a dog. They could change things around and add more features as they went along. This took up pretty much all the time we had in our first class. I collected the papers and stored them away for a week.

The following week we discussed what the primary colours are and I demonstrated how to hold a brush and apply paint to the paper. I returned their work from the week before and handed out the paints. For many in grade one it was a challenge to stay in the lines but for the most part they managed to keep the colours from blending into one another. We used tempera paint so it took a while to dry. I asked the homeroom teacher to give the students time to go over the pencil lines with a black Sharpie so that their dogs would reappear.

I loved their finished works of art. I’ve selected a few to share with you.

This slideshow requires JavaScript.

IMG_6280

Starry Nights

….another great art lesson for kids 

Thanks to Carla Sonheim and Diane Culhane from Kids Art Week for this great lesson called Crayon Resist Night Sky.

This would be a great introduction to Vincent Van Gogh and his famous painting Starry Night. I used oil pastels but wax crayons would also work for this project. Students should be encouraged to use lighter colours from the crayon box, especially white. They make the most impact after the water colour is washed over them.

This could also be a lesson on texture so colouring in various directions and pressing quite hard are essential. Swirls and stars will add visual interest and are details seen in Van Gogh’s painting. Be brave and experiment with lots of different colours. Don’t limit yourself to colours that you think are sky colours. Reds, pinks and yellows and even greens make for very interesting night skies. Think of the Northern Lights and have fun.

Once the paper is filled with crayon or oil pastels move on to the water colours. Make them quite watery and start with the darker colours at the top of the page. Again use a variety of colours but avoid black. While the paint is wet you can also add salt to give your painting even more texture.

Using black or a very dark paper cut out silhouette shapes to add to the bottom of your painting. This can be anything you like; forests, hills, mountains, houses, fences and city skylines. When the paint is dry glue the shapes to the bottom of the paper. There you have it, your very own Starry Night painting.

IMG_5646 IMG_5647

Mother’s Day Cards – Kindergarten Style

….there were plenty of gifts made for moms in the kindergarten classes last week

I wanted to come up with a nice piece of art to put on a card that the children would be excited to give to their moms. I decided to to teach the children how to draw simple hearts and flower line drawings using paint. When the paint dried they could add more interesting detail using black (or coloured) markers.

When the children were happy with their creation they could use the entire piece and glue it down onto a sheet of card stock or they could have their favourite section trimmed to fit onto a card. Some of them took it a step further and actually cut up their shapes and then glued them down individually.

We wrote a message on the board for the children to copy in their own hand to add to their cards to create their original Mother’s Day Card. What do you think? Of course I’m biased but I think they’re fabulous.

fins