Inspired by Van Gogh’s Sunflowers

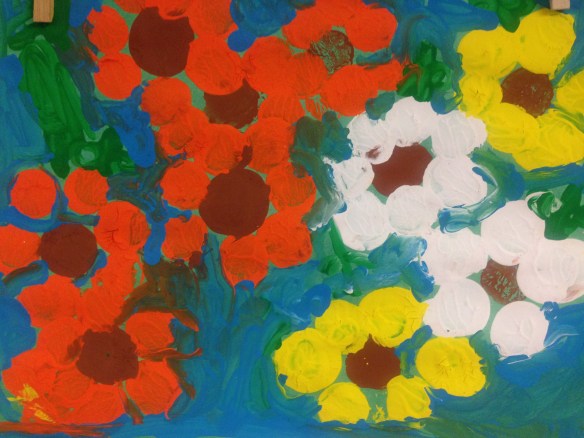
…..the kindergarten classes that I teach art to created a garden of Van Gogh inspired sunflowers

Recently I read the book The Artist and Me by Shane Peacock to the entire school. The book is one of the Blue Spruce nominees for 2017. the-artist-and-me-by-shane-peacock

I liked this book for two reasons. Firstly, because it is written for young children and highlights how the famous artist Vincent Van Gogh was bullied by children and adults alike. It points out that even adults are bullied when they appear different or do things differently. In Van Gogh’s case he suffered from depression and his art was different from the classics that people had come to expect from artists. The students were surprised that such a famous artist was treated so badly. I explained to them that Van Gogh was one of several new artists that had grown tired of traditional painting and wanted to experiment with texture, colour and paint strokes. People had a hard time excepting this new way of painting and in his lifetime Van Gogh only sold one painting.

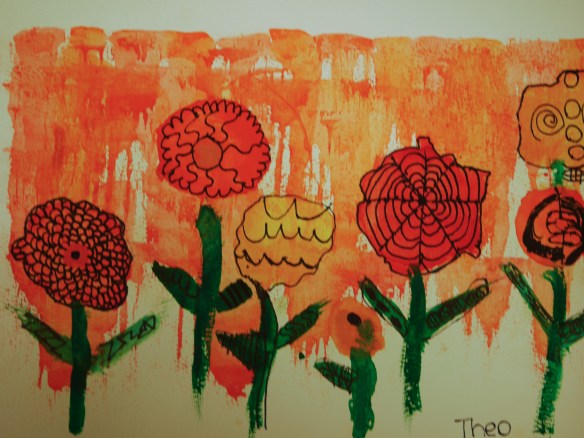
Secondly, I liked this book because the illustrator tried to use similar colours that Van Gogh used and he reproduced parts of Van Gogh’s work in his illustrations. For example there are a few illustrations of Van Gogh’s famous bedroom and an illustration of the wheat fields that he liked to paint.

I had other books that showed some of Van Gogh’s many paintings. I showed my kindergarten classes the sunflowers that Van Gogh became famous for after he died. In our art period I demonstrated how to paint simple sunflowers using round stamps. Some of the students used paintbrushes to create the petals of the sunflowers. We talked about the different varieties and colours of sunflowers and I gave them yellow, red, orange and white paint that they could mix if they wanted.

On the first day the students painted the centres and the petals of the flowers. On day two they added green leaves and stems. I also gave them the option of adding a blue sky in the background and I showed them how to paint around their flowers. Some of the students also added some ladybugs and other little critters.

IMG_1560IMG_1564

This slideshow requires JavaScript.


Creating Ginger Root Creatures

…..a grade 2/3 art project

For one of my assignments with Carla Sonheim’s 2017 Year Long Class: 365 we were instructed to take a piece of ginger root and draw the shape onto a piece of paper. Then were to take three colours and add detail to the shape to create some kind of fantastic creature. This was so much fun that I gave the same assignment to my grade 2 and grade 3 students. I bought a few pieces of ginger root and photo copied some photos of ginger root that I found on the internet. Here are the samples that I made to demonstrate the procedure to my classes.

The children chose the ginger root shape that they wanted to copy and they were encouraged to put their creature in a setting and give them a name. Here is a sampling of their creations:

This slideshow requires JavaScript.

“Thinking is the Enemy of Creativity”

…the kids loved this quote by Ray Bradbury

For the last two weeks we have been discussing the concept of creativity in our art classes. Once we established that having artistic ability and creativity didn’t necessarily go hand in hand I shared some quotes from a few famous people.

“Creativity is contagious. Pass it on!” – Albert Einstein

“Bad artists copy. Good artists steal.” – Pablo Picasso

“Creativity takes courage.” Henri Matisse

“Great art picks up where nature ends.” Marc Chagall

“Have no fear of perfection, you’ll never reach it.” Salvador Dali

“Creativity is allowing yourself to make mistakes. Art is knowing which ones to keep.” Scott Adams

“Every child is an artist. The problem is how to remain an artist once he grows up.” Pablo Picasso

“Think left and think right and think low and think high. Oh, the thinks you can think up if only you try” – Dr. Seuss

The students were then directed to print their favourite quote or part of it onto a white sheet of drawing paper with pencil. Then they were to turn it upside down and start drawing by extending the lines in the quote. Once the page was full they could outline the whole piece in black Sharpie and add some colour.

At this point the quote is almost unrecognizable so to remind us how the art started the child was directed to rewrite the quote somewhere on the paper where there was open space. The grade 3s really got into this assignment. A few forgot to turn the quote upside down. The first photo is the sample that I created so that the students would have a visual when I explained the process. I would encourage any of you to choose a quote from the ones I’ve posted or come up with your own and get CREATIVE. I would love to see what you come up with.

img_1005

Thanks to Carla Sonheim for the idea of gathering quotes about creativity and Stefanie von Hoesslin for the drawing activity using the quotes.

Stained Glass Trees Made With Pastels

….a lesson on blending analogous colours and warm and cool colours

Using chalk pastels and in some cases oil pastels, my grade 3 students designed a stained glass tree of their choice. They were asked to draw their lines to the edge of the paper and use thick black marker lines to represent the lead used in real stained glass art.

If they drew an evergreen tree they had to make sure that the negative space contrasted the actual tree and they were instructed to use the opposite colour choices for the background. In other words if they used warm colours for their tree than the  background would be in cool colours and vice versa. If their tree was a deciduous tree than the spaces between the branches and the negative space were the only areas that were coloured with bright analogous colours that blended nicely together.

For the most part my students understood the concept. Hope you enjoy the slide show of their work.

This slideshow requires JavaScript.

More Collage Art by my Grade Three Classes

….I love the finished collage projects that my grade three art classes produced

It took close to three weeks to get this assignment finished. The first week we collected and assorted coloured pages from magazine and discarded books. The second week we cut up and glued geometric shapes into cityscapes or country landscapes. In the final class we added line detail and dots to give the scene texture and interest. I think the boys and girls did a wonderful job.

This slideshow requires JavaScript.

More Collage Art

….from a different grade 3 class

I love how unique each piece is. This class started this assignment when I was away. The concept of creating a cityscape of buildings clearly wasn’t on the radar for some of these students but I can’t fault them when I wasn’t there to give them the instructions. Some of them also created more of a fantasy land with flying turtles and smiling buildings but I love that too.

img_0772img_0773img_0774img_0778img_0779

Norval Morrisseau’s Images Enchant Children

….it started as an art project with the kindergarteners

November was Aboriginal Month for our school board. I introduced my kindergarten class to Canadian First Nations artist Norval Morrisseau. He was sometimes referred to as the Picasso of the North. His art is characterized by the use of heavy black lines and bright vibrant colours.

I found a couple of images on the web that were reproducible and I drew a couple more free hand. I gave the children some bright acrylic paints and cotton swabs  and  taught them how to create dots with the Q-tips. Some of the children used the tool like a paint brush and didn’t really get the concept of creating dots but in the end they all cooked very nice.

I used the same sheets with my grade three students but it was suppose to be an extra project for the students who finished their other art project before the end of the class. In the end they all wanted to fill in one of the four images.

The first set were done by the kindergarten class.


This set was done by the grade 3s.

Pinterest is a Teacher’s Best Friend

….for art lessons, teaching math, classroom rules, class management and Christmas crafts

Last week we hosted our annual Craft Night at our school. It’s an event that the community of parents and students loves to attend. For weeks in advance the teachers pair up with a colleague (some go solo) and scour the internet for craft ideas that small children and their parents can successfully complete in 10 to 15 minutes or less.

The parent council funds the evening and each teacher is given a set amount of money  to purchase supplies. It works out to approximately $1.00 per craft. This year some of the crafts included bees wax candles, decorating glass ornaments, making bath salts,  and decorating cookies.

I went straight to Pinterest for inspiration and came across these beautiful paper trees mounted on a disc of spruce wood. Lyckoslanten is a Finnish blogger who posted this simple craft over at Lyckoslanten. I didn’t discover the translation button till much later but I easily figured out how to recreate this craft.

The tricky part was figuring out how to get the wood. At first I thought I could pick up branches from camp but that didn’t happen. Then I thought I could use the cut-offs from Christmas trees but we didn’t get our tree until after Craft Night.

into intoA week before  the event I went to a Winter Market in the Junction. While there I saw a couple of vendors who used birch wood to create some of their crafts. I also saw some beautiful trees made from birch wood. I asked them where they got their wood. One of the vendors offered to cut all the discs for me but at a price of course and it would have used up most of my budget. In hindsight it might have been worth it. The other vendor suggested that I buy the birch logs from a garden centre and use a chop saw to cut them up. A much cheaper option.

I went with the cheaper option and spent two evening cutting up two twelve foot birch branches into about 180 discs. I couldn’t belief the amount of sawdust it created. I spent almost as much time cleaning up as I did cutting. After I cut the discs I also had to drill holes into each disc for the skewers to fit. My friend L photocopied Christmas sheet music onto 150 sheets of photocopy paper. We tried heavier card stock but it was more difficult to fold.

On the night of the event we set up the tables at the back of the library with all the supplies that people needed to complete the trees. We added some tiny gift boxes that could be added to the base and some stars and snowflakes that could be glued onto the paper.

The entire evening took only an hour but it was extremely busy and I spent most of my time punching holes into the pleated paper so that the skewers could go through the middle. By the way, the best tool for this turned out to be an awl and a hammer. All in all it was a very successful night and everyone loved their trees.

img_0747

Gathering Colours from Magazines and Old Books

….and then cutting them into squares, rectangles, circles and triangles to create buildings

The advantage of cutting out shapes from magazines or books is the added texture one gets. It is easier to just cut up construction paper but the act of looking for colour swatches in magazines teaches children and adults about the vast range of one colour (i.e., red can be cool (blue undertones) or warm (more yellow undertones), dark (with the addition of black) or light (by adding white) and vibrant or muted).

After a class of cutting and sorting colours we were ready to start cutting our shapes and layering  our pieces to create a collage of buildings. My grade threes were allowed to create a landscape of countryside buildings or a cityscape and they were encouraged to add foreground details and/or background details. The last step involved adding details with a black Sharpie and paint dots to make the whole piece come alive. The following are examples from one of my grade three classes.

img_0701img_0702img_0703img_0704img_0705img_0706img_0707img_0708img_0709img_0710