365 Days of Art – Day 7

….I’m a day behind because my new computer was uploading 23 000 photos from the cloud

I’ve continued with the theme ‘threading lightly’ from Carla Sonheim’s year-long class. For this abstract piece I used yupo paper and inks for threading. I love the acrylic inks because they are so vibrant. I filled the spaces with watercolour. The piece is 9″x 12″.

fullsizeoutput_6bd7

365 Days of Art – Day 5 Threading Lightly

….this comes from the first prompt of the new year long course that I am taking with Carla Sonheim

Threading lightly is a technique where you run cotton thread through wet watercolour and randomly lay it onto paper and press it with a brayer. We could leave it as an abstract piece or look for a shape within. I decided to find a shape and discovered this quirky duck. Tomorrow or later in the week I’m going to try this technique with ink and perhaps try a landscape.

fullsizeoutput_7b06

365 Days of Art – Day 4

….decided to switch it up a bit

Today I found some leaves pressed in one of my sketch books and I decided to use it as a collage element. I was also inspired by Herma from Studio Mastarre who draws very whimsical portraits. I haven’t tried to copy her style with today’s post but at some point I’d like to try my hand at it. I did use pencil to start with and I added some watercolour to finish.

IMG_0457

365 Days of Art – Days 1, 2 and 3

…..meditative and fun to do 

I’m loving my personal challenge so far. Three days in and I’ve managed to produce three pieces of abstract art. I won’t always do the same type of art and I will eventually move onto larger pieces. I may even take some of these smaller pieces and use them as inspiration for a larger piece using a different medium, perhaps acrylic or ink.

January 1st, 2018

fullsizeoutput_7afe

January 2, 2018

fullsizeoutput_7b01

January 3, 2018

fullsizeoutput_7b03


More Fun Faces

….a few more art projects done by my grade 3 classes

This last assignment on drawing faces has to be one of my favourite projects. If I ever get called back to do supply work in an art class I’ll definitely pull this one out of my bag of tricks if I have to come up with my own lesson plan.

Geometric Fish

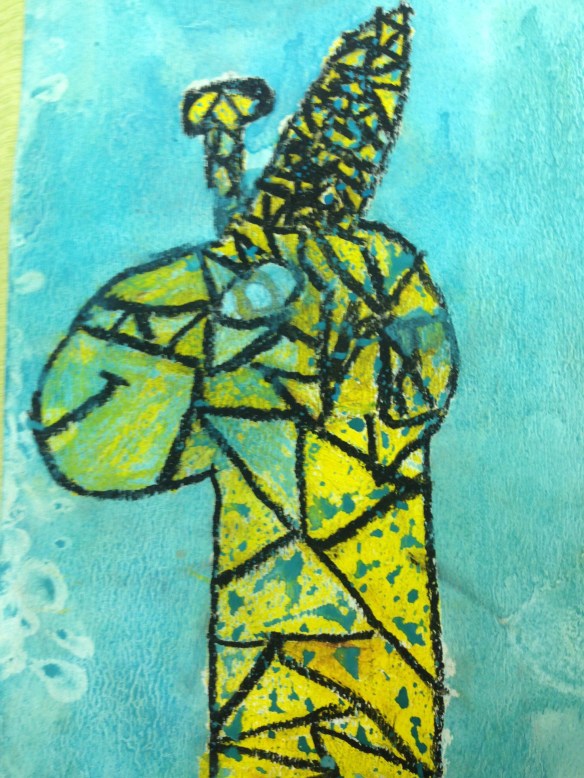
…..it’s easy to draw fish using geometric shapes like rectangles, squares and triangles

For a recent kindergarten art class I read a counting book that was illustrated with funny little fish that came in all shapes and sizes. The illustrator created simple fish shapes with ovals, triangles and square shapes. I demonstrated how to draw a fish using a combination of these shapes. A square, turned to look like a kite, for the body, triangles for the fins and tail and circles for the eyes.

Each student was give a sheet of watercolour paper and a variety of crayon colours and they were instructed to draw at least three fish and some seaweed. I also taught them the trick of making circles with white crayons that would appear magically when they added their watercolour paint.

On my second visit to the class I taught them how to water down the paint and do a wash across their picture. We also talked about using colours that would blend nicely if they wanted to use more than one colour for their background. Again they did a wonderful job. I’m always amazed at how uninhibited young children can be with a little instruction and encouragement from their instructor and peers.

In this class we learned about contour drawings using simple shapes, crayon resist using watercolours, blending colours and using space effectively.

IMG_1553IMG_1558

This slideshow requires JavaScript.

A Garden of Spring Flowers in Paint

….in this part of the world spring is not close at hand

Looking at blogs that originate in Ireland, the United Kingdom, parts of Europe and the west coast of North America I’m amazed to see so many gardens that are already in bloom with beautiful spring flowers. With some luck we may see our first daffodil in late April but most of our flowers won’t appear until May.

To get us in the spring mood I painted some simple made up flowers using watercolours and circle shapes. For the background I used a scraping technique that I learned from Carla Sonheim. Once the paint was dry I added more detail, sometimes with  more paint but mostly with black ink from a Sharpie. I liked the final product so much I adapted it for my students and when I return to school this week I will plaster the walls with their beautiful gardens of flowers. I will share their work with you later this week.

IMG_1259IMG_1261

More Paul Klee Art

…. all from my grade 1s

I’ve really enjoyed teaching this unit on Paul Klee. The grade 1s and 2s really enjoyed the process and I loved their finished pieces. The grids took a lot of concentration and you can tell which students took their time. Some started out with good intentions but after awhile they changed course just so that they could be finished with it.

Here are some more portraits in the Paul Klee style. I love the giraffe.FullSizeRender-18
FullSizeRender-17FullSizeRender-16FullSizeRender-15

It was this class that put their grid art into frames for Father’s Day. I wonder how they liked their gifts.


Paul Klee Inspired Art

….experimenting with Paul Klee’s style

The students in grades 1,2 and 3 that I teach art to were given a couple of quick assignments that could be finished in one or two periods. Seeing that we’re nearing the end of the school year this was important to me.

The first lesson I taught involved drawing a Klee style portrait. It didn’t have to be of a person. Many of the children chose to draw an animal. The technique that I used for this lesson came from Splat, Scrap and Glue Blobs and Deep Space Sparkle.

IMG_8621

This slideshow requires JavaScript.

A couple of weeks after introducing my students to Paul Klee, Carl Sonheim from  my on-line course Y is for Yellow also introduced us to Paul Klee but instead of portraits she focused on his grid paintings. Some of my classes needed a quick project that could be framed for Father’s Day so I took a chance and taught the children how to draw a grid and how to carefully use watercolours to fill in the spaces. I limited them to three colours of their choice and demonstrated how to control the water and the amount of colour to use. They learned how to mix the water with the paints and control and change the darkness and lightness of the colour. They also learned how to erase mistakes by adding more water and dabbing away the excess water.

I’m always impressed with students who actually listen and follow the directions. Very few children created ‘mud’ and those who did were able to fix it or when they started again created a much better product the second time around. One of the grade one classes framed their paintings with a frame from the dollar store and wrapped them up for Father’s Day. Children’s art always looks so nice when it’s framed. I would have loved any one of them as a gift.


Starting With a Child’s Piece of Art

….an assignment from one of my many on-line classes

One of the classes that I’ve taken this year is from Sketch Book Skool.  We had 6 different instructors who all assigned different sketching and painting projects. One that especially intrigued me involved getting a young child to draw in my sketch book and then work a drawing around the child’s original piece.

At school I have a couple of students who like to come to the library after school and help me put books away. When I was given this assignment I asked J in grade one if he would like to draw in my book and then allow me to draw around his work and create a new piece. He was more than happy to do that and he took my book and very carefully and thoughtfully began drawing his picture. I thought he might draw the typical house and tree with him and his family standing in front but to my surprise he drew six flower pots with a flower in each.

Here is J’s work and then what I created from it. I used watercolour and ink around the pencil crayon drawings.

IMG_8016IMG_8017