Birds of a Feather

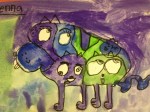
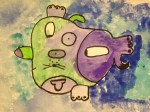
…..just add a beak to a scrap piece of paper and voila you have a bird

I got this idea from Carla Sonheim and I find that it works with all age groups. I’ve used it with kindergarten children and children in grades 1 to 5.

This year I had the children create a tree by printing the shape with the edge of a piece of thick cardboard dipped in brown paint. While we waited for it to dry I had the students practise drawing a variety of leaf shapes and then deciding which one they would use on their tree.

Once the paint dried I instructed the students to tear small pieces of coloured and patterned papers and then glue them to the tree branches. With a pencil or a black Sharpie they started creating their birds by adding a beak and then an eye. After that they could add as much or as little detail as they wanted. Once the birds were done they were instructed to draw the leaves in the open spaces and colour them in.

I love how these turned out. The following are examples from my grade two class.

Imaginary Creatures Created From Sidewalk Cracks

….I can’t tell you how much my students loved going outside and sketching the cracks in the pavement

Today my grade two students took their favourite sidewalk crack and using it as the starting point drew an imaginary creature. I can’t take credit for this idea. I’m taking an on-line class with Carla Sonheim called Imaginary Creatures and one of the assignments was to pull out images from cracks anywhere you could them.

Here are some of the creatures that my grade two class created today. I included two of the original cracks that inspired the finished project. I hope you enjoy them!


Starry Nights in Oil Pastel and Watercolour

….children in grades one, two and three create their own version of Van Gogh’s Starry, Starry Night

Once again I was inspired by Carla Sonheim’s Free Kids Online Art Classes. In week two Diane Culhane introduced the kids to a crayon resist night sky.

The children loved how the watercolour brought up the crayon designs, especially the white marks. They also loved sprinkling salt over their creations. The concept of cutting out a black silhouette of a city or country skyline was a bit more challenging, especially for the grade ones. Here’s a collection of paintings created by my grade two class.

Warm and Cool Picasso Dogs

….this will be the last group of Picasso Dogs that I post

Carla Sonheim has inspired me to teach my students about Picasso. Each grade level was  approached slightly differently to meet the curriculum expectations for that grade. This gallery of Picasso Dogs was done by my grade three class and the emphasis was on cool and warm colours.

Grade 2s Love Their Picasso Dogs

….same process as the grade 1s but we learned how to mix primary colours to make secondary colours

Thanks to Carla Sonheim’s free kids on-line classes for this terrific lesson.

Click on each image to get the entire picture.

Picasso Dogs From the Imaginations of Grade One Students

….thanks to Carla Sonheim’s free on-line kid’s art lessons for this idea

For my very first art lesson this year I introduced my grade one, two and three classes to Pablo Picasso. We looked at his traditional vs abstract paintings and explored some of his unusual portraits. Carla’s unique approach to drawing an abstract dog made the assignment fun and less intimidating than drawing a traditional human face.

After we practised drawing some dog features (snouts, eyes, ears, tails, paws) I gave each child a piece of watercolour paper and instructed them to draw an eye, turn the paper and draw a larger eye and continued like this until there were six or seven features on the paper. Then they had to turn the paper and find the layout they liked best and start joining the features to create a dog. They could change things around and add more features as they went along. This took up pretty much all the time we had in our first class. I collected the papers and stored them away for a week.

The following week we discussed what the primary colours are and I demonstrated how to hold a brush and apply paint to the paper. I returned their work from the week before and handed out the paints. For many in grade one it was a challenge to stay in the lines but for the most part they managed to keep the colours from blending into one another. We used tempera paint so it took a while to dry. I asked the homeroom teacher to give the students time to go over the pencil lines with a black Sharpie so that their dogs would reappear.

I loved their finished works of art. I’ve selected a few to share with you.

This slideshow requires JavaScript.

IMG_6280

Finger Painting Brings Out the Child in Me

…thanks to Carla’s recent on-line mini class in finger painting 

Using only your hands to paint is very liberating. I loved the simplicity of it and the feel of the paint on my fingers. I’m hoping to do more and I haven’t even tackled the third assignment that let’s you get really messy.IMG_6208

The first assignment was to create a palette of colours using your fingers to mix the paint and apply them to the paper. The second part was to paint a vase of flowers but I decided to use two of my photographs that I recently posted and try to recreate them with this finger painting technique. Jill Kuhn actually gave me the idea after she commented on the first photo, suggesting that I paint it with watercolours. Instead, I used acrylics and my fingers. What do you think?

IMG_6169 IMG_6214

IMG_6173

IMG_6209

Starry Nights

….another great art lesson for kids 

Thanks to Carla Sonheim and Diane Culhane from Kids Art Week for this great lesson called Crayon Resist Night Sky.

This would be a great introduction to Vincent Van Gogh and his famous painting Starry Night. I used oil pastels but wax crayons would also work for this project. Students should be encouraged to use lighter colours from the crayon box, especially white. They make the most impact after the water colour is washed over them.

This could also be a lesson on texture so colouring in various directions and pressing quite hard are essential. Swirls and stars will add visual interest and are details seen in Van Gogh’s painting. Be brave and experiment with lots of different colours. Don’t limit yourself to colours that you think are sky colours. Reds, pinks and yellows and even greens make for very interesting night skies. Think of the Northern Lights and have fun.

Once the paper is filled with crayon or oil pastels move on to the water colours. Make them quite watery and start with the darker colours at the top of the page. Again use a variety of colours but avoid black. While the paint is wet you can also add salt to give your painting even more texture.

Using black or a very dark paper cut out silhouette shapes to add to the bottom of your painting. This can be anything you like; forests, hills, mountains, houses, fences and city skylines. When the paint is dry glue the shapes to the bottom of the paper. There you have it, your very own Starry Night painting.

IMG_5646 IMG_5647

My First Art Lesson for September is Ready to Go

…..thanks to Carla Sonheim and her free Kid’s Art Week

I’m always looking for new and fun ways to teach art to my students. Next year I’ll be teaching grades 1,2, and 3. I like to combine a little art history with the elements of design when I introduce a lesson. Carla’s Picasso Dogs is perfect. The kids will learn a little bit about Picasso, cubism and primary and secondary colours.

Students will be given a small piece of watercolour paper and a pencil or black oil pastel. They will be instructed to draw individual items that pertain to a dog or any animal that they choose. After drawing the first body part they will turn their papers 90 degrees and then draw the second part. They will do this six or seven times and then they will connect all the parts to create their Picasso animal or alien.

Once the parts are all connected the students will be given further instructions to draw lines across the animal to divide it into smaller sections (this is the cubism part). The first animal will use only primary colours. Once that piece is finished they may create a second animal and I will teach them how to mix the primary colours to create secondary colours. This animal will only be painted with secondary colours. The final step is to go over all the pencil lines with a black marker.

For students who work quickly they may draw a third animal and use a combination of primary and secondary colours. Here are my samples:

IMG_5643 IMG_5644 IMG_5645

Print Making at the Cottage

…..Sunday, July 5, 2015

A few days ago I wrote about stopping in Midland to purchase some tracing paper. On Sunday I took the six sheets that were gifted to me and tore them in half. I now had 12 sheets of paper to experiment with and attempt Lesson 13 from the Year of the Spark. As some of you know I’m taking an on-line course with Carla Sonheim and Lynn Whipple.

This week’s assignment comes from Carla. We’ve been instructed to paint a picture with black acrylic paint onto a piece of plexiglass and then, before it dries lay a piece of tracing paper on top to create a print. After creating several prints we are suppose to lay interesting papers underneath that will show through the tracing paper and add bits of collage to the surface to create a new piece of art. The final step is to photograph the finished piece and then the actual artwork is the photograph.

IMG_5419 IMG_5447 IMG_5454 IMG_5456

Being at the cottage I was somewhat limited with what I could use. My black paint dried pretty quickly and I didn’t have the extender that would have solved that problem. I quickly threw some papers into a bin before I came up here but I was wishing I had added more, especially more of my gelli prints. Having said that I’m pretty pleased with the pieces that I’ve created. I’m thinking that some of these might make interesting cards. What do you think?